
Photo credit Grafika Studio
The Internet is becoming more aesthetic every day. Beautiful and well-styled images are your best shot to create an emotional connection with your audience through visual content, and make people fall in love with what you do and how you do it.
That's why we spend so much time sharing photos of our day-to-day work in social media, behind the scenes shots, sneak peeks of new products and a lot more, especially on Instagram or our blogs. Getting these shots right can make your business stand out.
I'm not a professional photographer, so all I've got to get good shots is my iPhone. But as much as I tried, I never got a shot with the perfect light exposure inside my home. Lucky, I got a not-so secret weapon to fix all my lighting issues: Photoshop*
Correcting light and colour with Photoshop is very easy. You just need to know a few quick tips to make the right image corrections. Today, I'm sharing my most common tips in this 3-step tutorial so that you can take your photos from 'meeeeh' to 'yay!' in just 10 minutes.
Ok, so let's get started. I got this photo today by placing the fruit jelly box on top of a white cardboard and on a table next to the window. As you can see the light here is still 'meeehh'. Let's fix that.

Original photo from iPhone
Step 1 | Light correction
I open my photo in Photoshop and go to Image > Adjustment > Levels. With this tool I can make whites look whiter (rather than ugly greys) and blacks blacker. You usually know when whites and blacks are right by placing the controls just under the beginning of the curve in both sides.
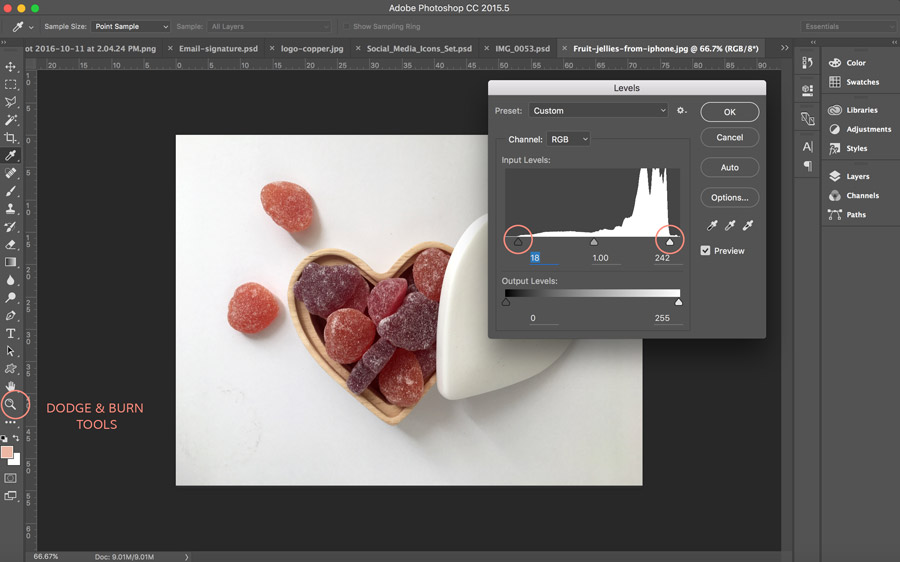
Play with Levels to intensify whites and blacks
You can also use the Dodge and Burn tools, in the Tools window (left side of the screen) to correct the light in specific points of the image.
STEP 2 | Lighting Mask
With just these quick adjustments the light is now looking a lot better and colours start to brighten up. However the image didn't have a uniform light (I just had my window as a light source). As a consequence of this, the light is too bright from one of the corners, making some jellies look too pale.

After correcting the lighting, there is part of the image that is now overexposed
Solution: duplicate the image layer in Photoshop and apply a mask (see image below). Then go to the Gradient Tool in the Tools window (left side of the screen) and select the black and white gradient. Apply the gradient to the layer mask in the direction of the natural light, in this case from the top left corner to the right bottom side.
By doing this you just made half of the image transparent (hide the layers below to see the transparency). Now you can adjust separately the light in this over-exposed corner by playing again with the levels, as you did in Step 1.

Create a layer mask to correct light in just one part of the image
Step 3 | Bending Layers
Finally, from your Layers tab, select your lighting mask layer and click on the bending mode drop-down menu (just on top of your layer list and next to the layer Opacity). It should be set to Normal. Change to Soft Light.
And voila! you just got a perfect lighting for your image!
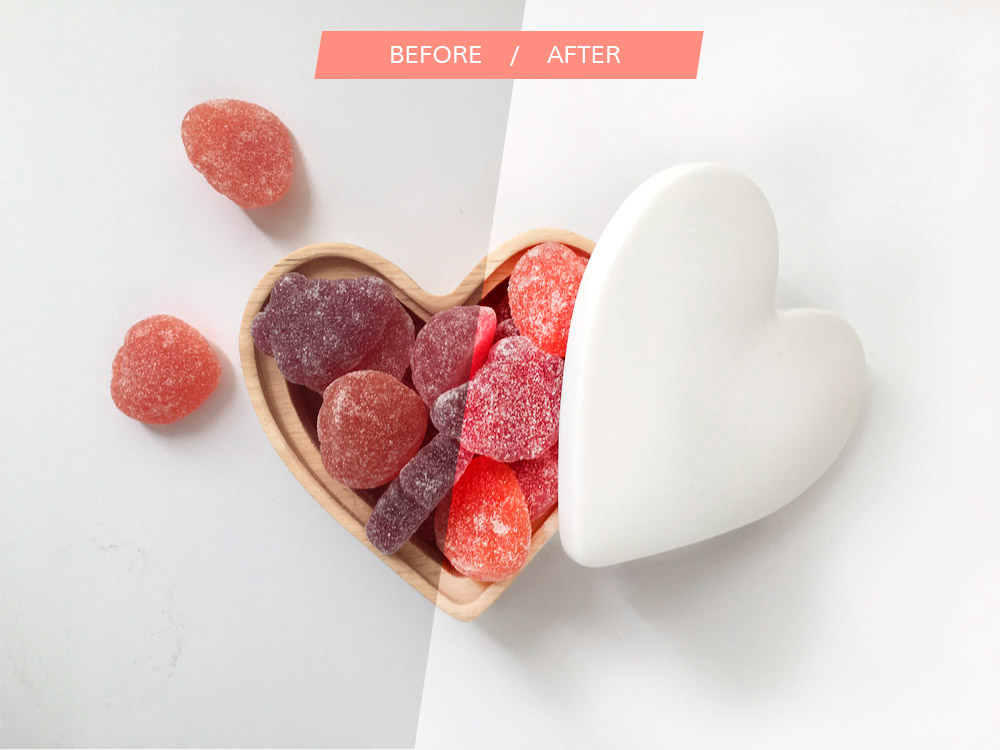
Light is brighter and colours are more vibrant


The revamping of the Oh Flossy play make-up boxes came with a clear brief to create attractive and engaging packaging designs to capture the attention of children as well as their parents. The project goals were well-defined and the result would delight customers and pour great reviews.